

As the crisp air of autumn descends and leaves transform into a vibrant tapestry of reds, oranges, and golds, there’s an undeniable urge to bring the beauty of the season indoors. What better way to capture this fleeting magic than by embedding these natural wonders into everyday items? Today, we’re going to embark on a delightful crafting journey to create stunning clear soap bars, each encapsulating a delicate autumn leaf. This project is not only incredibly satisfying but also results in beautiful, unique gifts or charming additions to your own home decor.
This step-by-step tutorial will guide you through the simple process of making these botanical beauties. Whether you’re a seasoned crafter or a curious beginner, you’ll find this project accessible and rewarding. So, gather your supplies, embrace the spirit of autumn, and let’s create something truly special!
What You’ll Need: Materials for Your Autumn Leaf Soaps
Before we dive into the crafting process, let’s ensure you have all the necessary materials at hand. Having everything organized and ready will make your soap-making experience smooth and enjoyable.

Here’s a comprehensive list of what you’ll need:
- Clear Glycerin Soap Base: This is the foundation of your clear soaps. It’s easy to melt and provides a transparent canvas for your embedded leaves. You can find it in blocks or pre-cut cubes at most craft stores or online.
- Silicone Soap Mold: Opt for a mold with rectangular or square cavities. Silicone molds are ideal because they are flexible, making it incredibly easy to unmold your finished soaps without damaging them.
- Dried and Pressed Autumn Leaves: This is where the magic happens! Collect a variety of autumn leaves in different shapes, sizes, and colors. Maple, oak, and fern leaves work wonderfully. Ensure they are completely dry and pressed flat to prevent them from molding or causing issues within the soap. You can press them between heavy books for a few weeks, or use a craft leaf press.
- Heat-Safe Measuring Cup or Microwave-Safe Bowl: For melting your soap base. A measuring cup with a spout will make pouring much easier.
- Stirring Stick or Spoon: To stir the melting soap base.
- Rubbing Alcohol (in a spray bottle): This is a secret weapon for soap making! A light spritz of rubbing alcohol on the surface of your poured soap will pop any air bubbles, ensuring a crystal-clear finish.
- Cutting Knife or Soap Cutter: To cut your soap base into smaller, manageable pieces for melting.
Now that you have all your materials ready, let’s move on to the exciting part: crafting your autumn leaf embedded soaps!
Step-by-Step Tutorial: Crafting Your Leaf-Embedded Soaps
Follow these instructions carefully to create your beautiful autumn leaf soaps. Precision and patience are key to achieving a professional-looking result.
Step 1: Prepare Your Autumn Leaves

Before you begin, ensure your autumn leaves are thoroughly dried and pressed. Any moisture in the leaves can cause issues with your soap, leading to discoloration or mold over time. If you’ve just collected fresh leaves, you’ll need to press them for at least two to three weeks between heavy books or in a dedicated leaf press. The flatter and drier they are, the better they will embed in the soap.
Once dried, carefully select the leaves you wish to use. Look for leaves that are intact, vibrant in color, and free from any blemishes or tears. Gently wipe them clean with a dry cloth to remove any dust or debris. Remember, these leaves will be encased in clear soap, so their appearance will be a focal point of your finished product.
Step 2: Melt the Clear Glycerin Soap Base
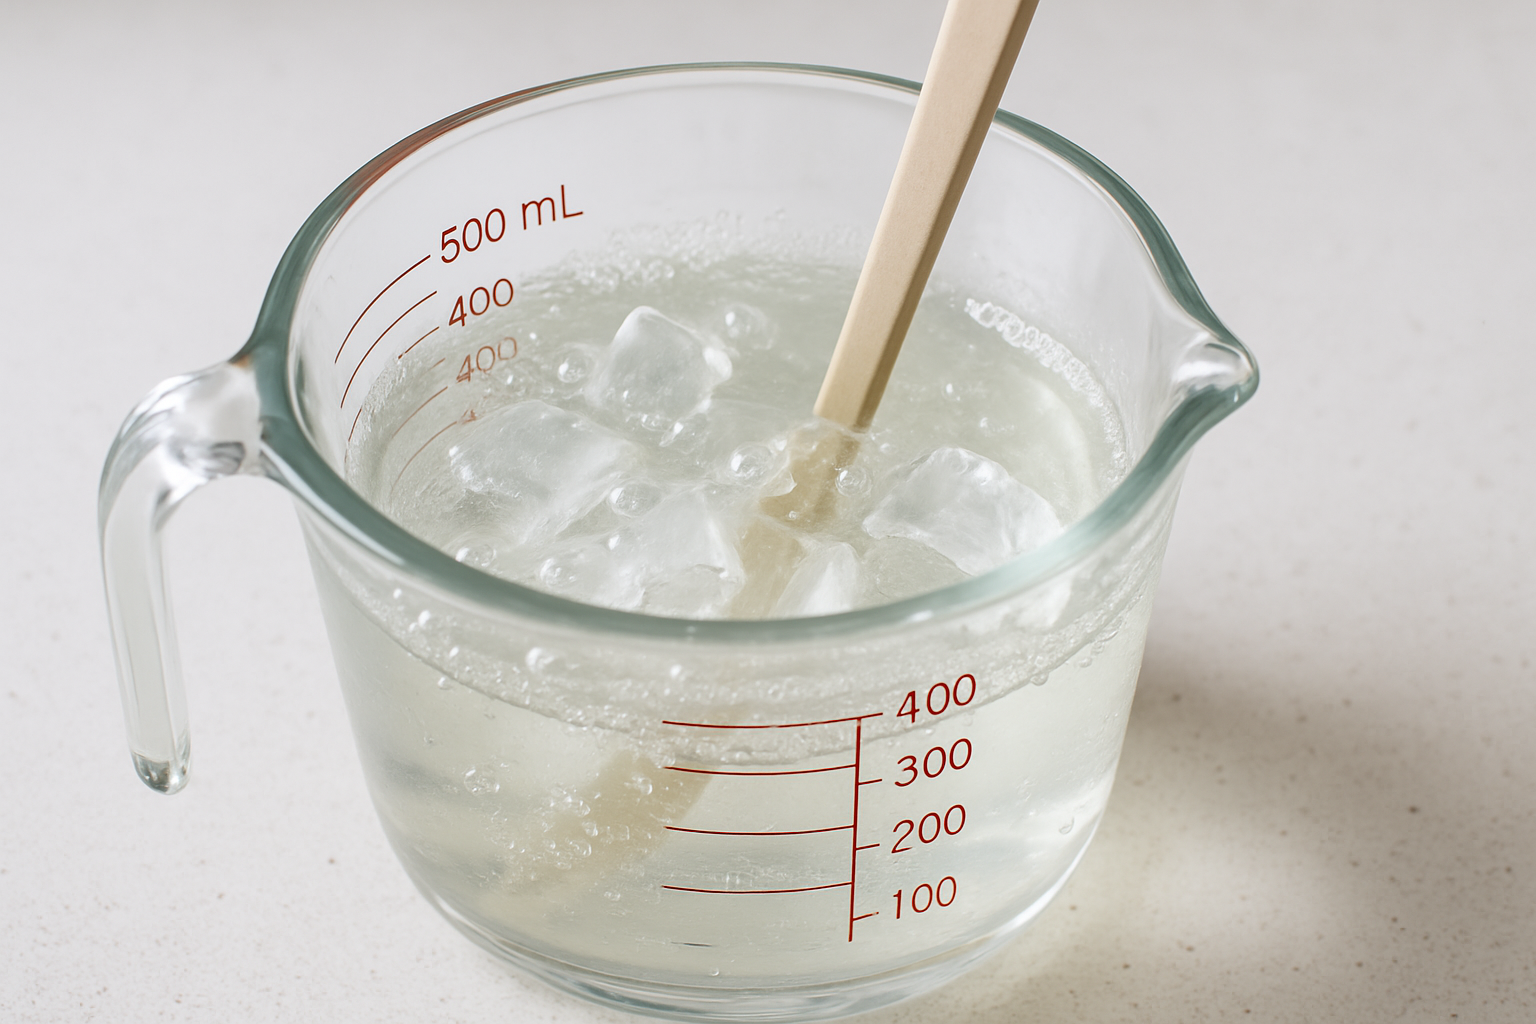
Now it’s time to prepare your soap base. Using your cutting knife or soap cutter, carefully cut the clear glycerin soap base into smaller, uniform cubes. This will help it melt more evenly and quickly. Place the cut soap cubes into your heat-safe measuring cup or microwave-safe bowl.
There are two primary methods for melting the soap base:
- Microwave Method: This is the quickest and most common method. Heat the soap base in the microwave in 30-second intervals, stirring well after each interval. Be careful not to overheat the soap, as this can cause it to lose its clarity or develop a rubbery texture. Continue heating and stirring until the soap is completely melted and smooth, with no solid lumps remaining.
- Double Boiler Method: If you prefer a stovetop method, you can use a double boiler. Place the bowl with the soap cubes over a pot of simmering water, ensuring the bottom of the bowl does not touch the water. Stir continuously until the soap is fully melted. This method offers more control over the melting process and reduces the risk of overheating.
Once your soap base is fully melted, set it aside for a moment. It should be clear and free of any bubbles. If you notice a few bubbles on the surface, a quick spritz of rubbing alcohol will help them disappear.
Step 3: Place Leaves in the Silicone Mold
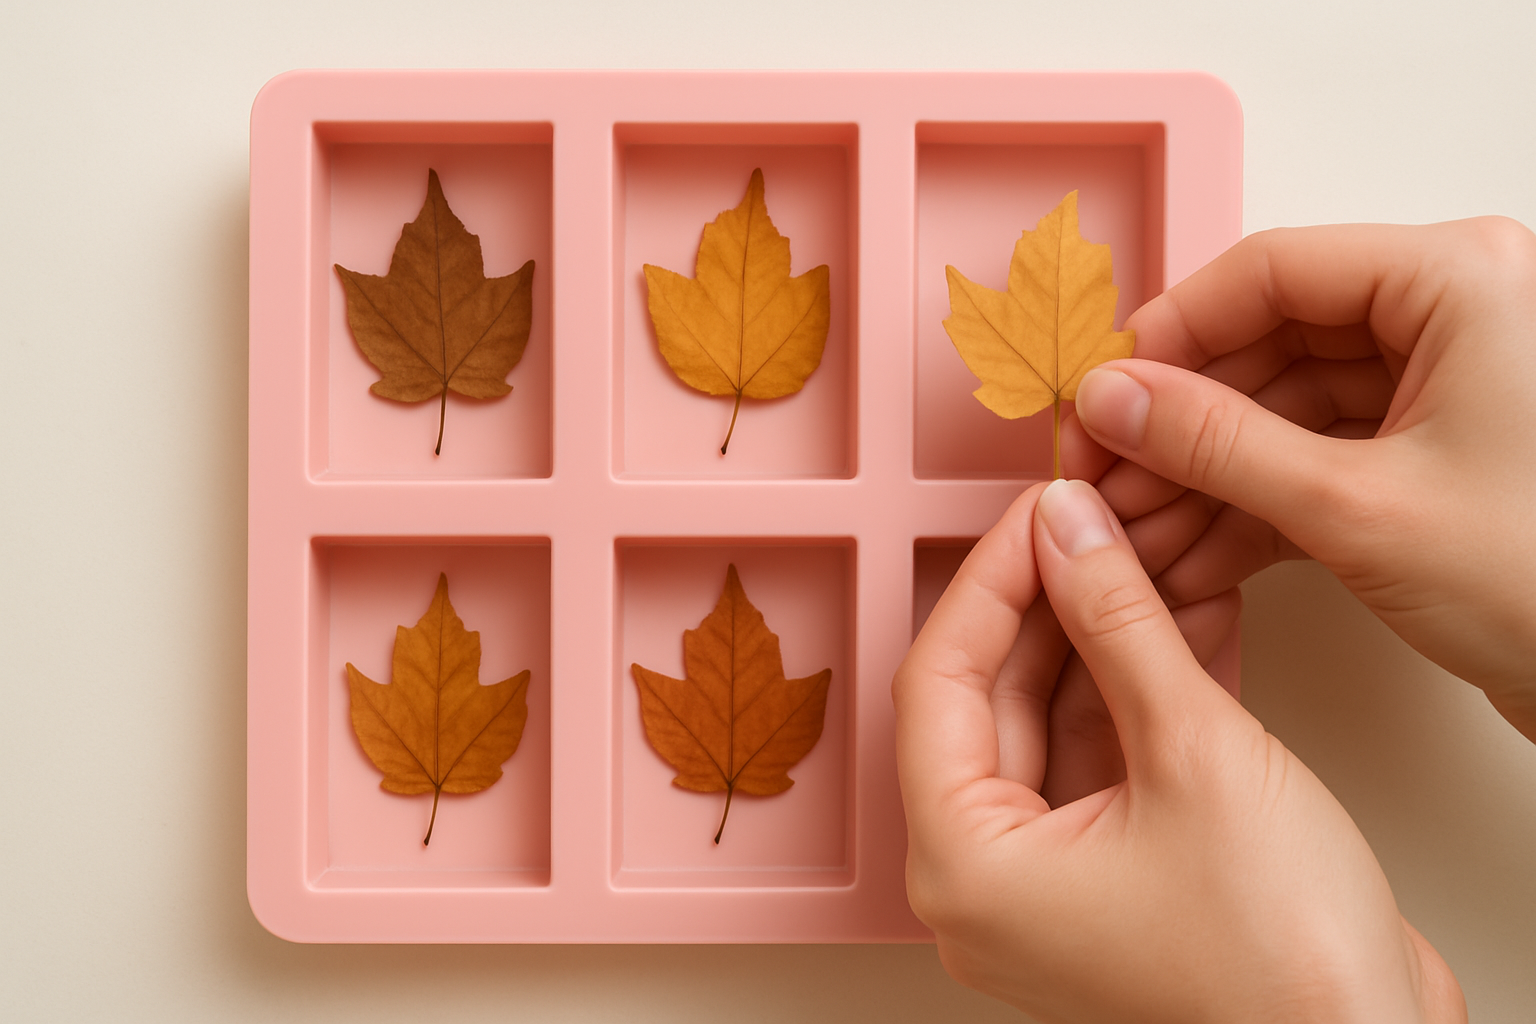
This step requires a delicate touch to ensure your leaves are perfectly positioned within the soap. Carefully place one dried autumn leaf into the bottom of each cavity of your silicone soap mold. Try to center the leaf as much as possible, and ensure it lies flat against the bottom. If your leaves are slightly curled, you can gently press them down with your finger to flatten them. The goal is to have the leaf fully visible and suspended within the clear soap once it hardens.
Consider the arrangement and variety of leaves in your mold. You can use different types of leaves in each cavity for a varied set of soaps, or stick to one type for a cohesive look. Take your time with this step, as the placement of the leaf will significantly impact the final aesthetic of your soap bar.
Step 4: Pour the Melted Soap Base
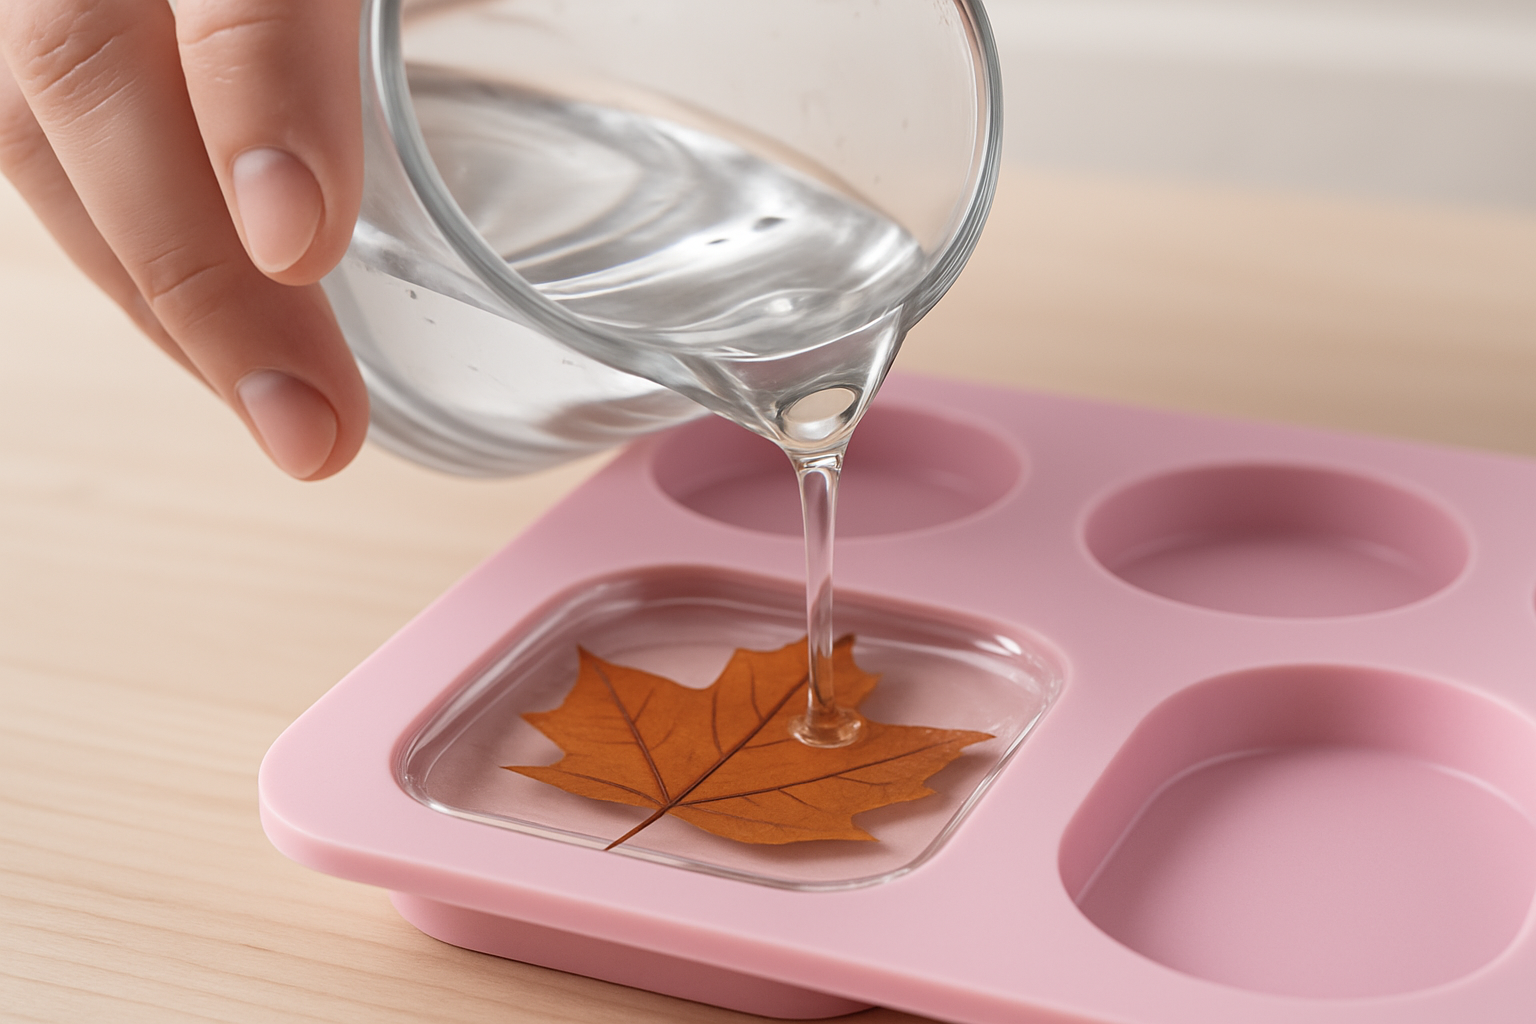
With your leaves perfectly placed, it’s time to pour the melted soap base. Slowly and carefully pour the melted clear glycerin soap into each mold cavity, covering the embedded leaves. Pour gently to avoid disturbing the leaves or creating excessive air bubbles. Fill each cavity to the desired level, leaving a small space at the top if you plan to add another layer later (though for this simple tutorial, a single pour is sufficient).
As you pour, you might notice some small bubbles forming on the surface. This is where your rubbing alcohol spray comes in handy! Immediately after pouring, lightly spritz the surface of the soap in each mold with rubbing alcohol. This will instantly pop any surface bubbles, ensuring a smooth, crystal-clear finish to your soap bars. Don’t over-spray, a light mist is all that’s needed.
Once poured, do not move the molds. Find a flat, undisturbed surface where they can sit and cool completely.
Step 5: Cure and Unmold Your Soaps
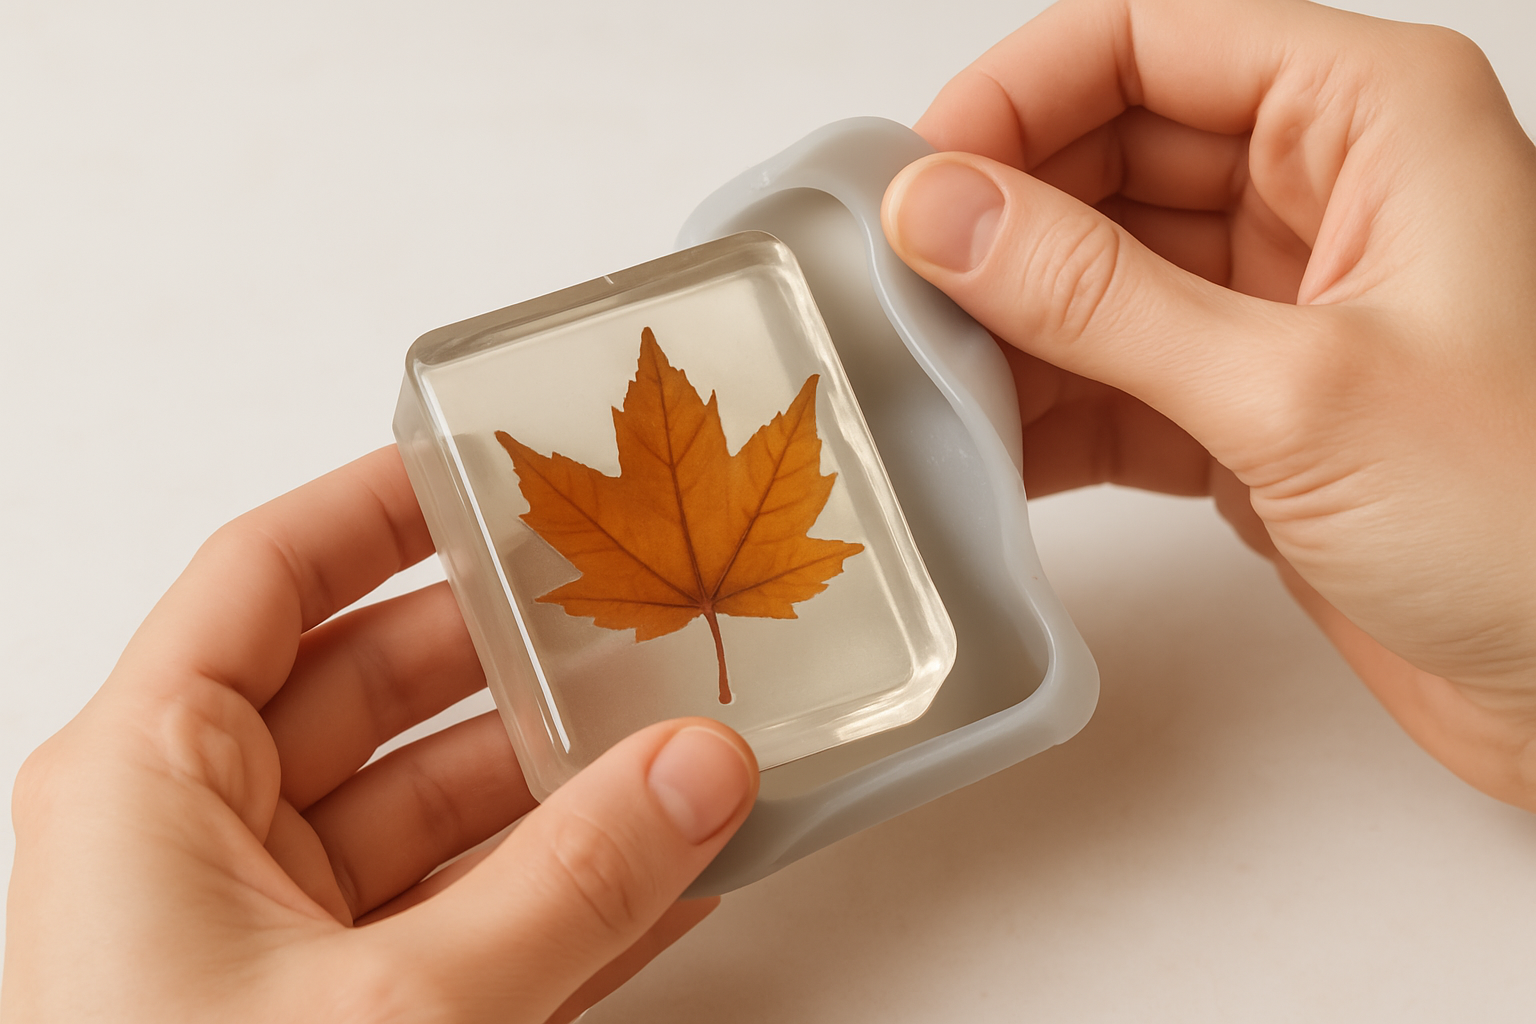
Allow your soap bars to cool and harden completely. This typically takes a few hours at room temperature, or you can speed up the process by placing the molds in the refrigerator for about 30-60 minutes. The soap is fully cured when it is firm to the touch and easily pulls away from the sides of the mold.
Once hardened, gently unmold your beautiful autumn leaf soaps. Silicone molds are very flexible, so you can usually just push up from the bottom of each cavity to release the soap. If you encounter any resistance, gently peel back the edges of the mold. Avoid forcing the soap out, as this could damage the delicate embedded leaf or the soap bar itself.
Your clear leaf-embedded soaps are now ready to be admired and used! They make wonderful decorative pieces, thoughtful handmade gifts, or a luxurious addition to your own bath and body routine.
Embrace the Beauty of Autumn
Creating these clear autumn leaf embedded soaps is a delightful way to bring the beauty of the fall season into your home. Each bar is a miniature work of art, capturing the intricate details and vibrant colors of nature. This project is not only simple and enjoyable but also yields a truly unique and personalized product.
Whether you’re making them for yourself, as gifts for loved ones, or to sell at craft fairs, these soaps are sure to impress. Experiment with different types of leaves, mold shapes, or even subtle soap colorants (ensure they are transparent to maintain visibility of the leaves) to create your own variations. Enjoy the process of crafting and the satisfaction of creating something beautiful with your own hands. Happy soap making!