
As the days grow shorter and the air turns crisp, there’s a natural inclination to bring warmth and coziness into our homes. While store-bought decorations abound, there’s a unique charm and satisfaction that comes from crafting your own. Imagine the soft, ambient glow of fairy lights, each nestled within a tiny, natural acorn cap, casting a gentle warmth across your living space. These delightful acorn cap fairy light covers are not just a beautiful addition to your autumn and winter decor; they’re a testament to the simple beauty found in nature and the joy of DIY.
This tutorial will guide you through the surprisingly simple process of transforming humble acorn caps into enchanting covers for your fairy lights. Whether you’re looking to add a touch of rustic elegance to your holiday decorations, create a unique centerpiece for a seasonal gathering, or simply enjoy a mindful crafting session, this project is perfect for crafters of all skill levels. With just a few readily available materials and a little bit of patience, you’ll be able to create a truly magical display that captures the essence of the season. Let’s gather our supplies and embark on this journey of crafting enchantment!
Materials You’ll Need
Before we dive into the crafting process, let’s ensure you have all the necessary materials at hand. Most of these items are easily found in nature, at craft stores, or even around your home. Gathering everything beforehand will make your crafting experience smooth and enjoyable.
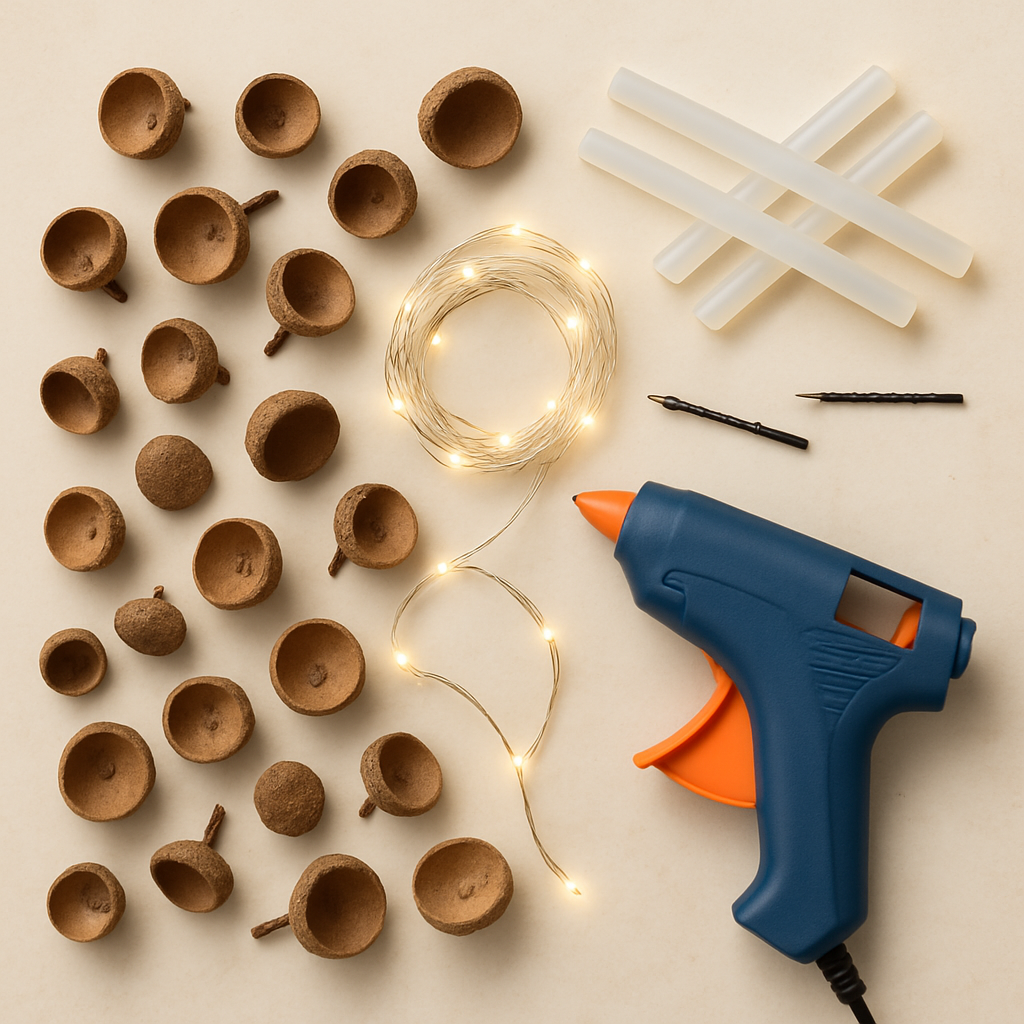
- Acorn Caps: The stars of our project! You’ll need a good collection of acorn caps of various sizes. The larger and deeper the cap, the easier it will be to work with. Ensure they are clean and completely dry before use. You can collect these from parks, forests, or even your backyard if you have oak trees. If you’re having trouble finding them, some craft stores or online retailers might sell them.
- Fairy Lights: Opt for LED fairy lights, preferably battery-operated, as they generate very little heat, making them safe for this project. The wire should be thin and flexible to easily maneuver through the acorn caps. Warm white lights tend to give the coziest glow, but feel free to experiment with other colors.
- Hot Glue Gun and Glue Sticks: A reliable hot glue gun is essential for securely attaching the acorn caps to the fairy lights. Make sure you have plenty of glue sticks on hand.
- Drill with a Small Bit (or a Sharp Awl): You’ll need a tool to create a small hole in the center of each acorn cap. A small drill bit (around 1/8 inch or 3mm, depending on the size of your fairy light bulbs) is ideal for precision. If you don’t have a drill, a sharp awl or even a sturdy nail and hammer can work, but exercise caution.
- Optional: Clear Sealant/Varnish: If you want to enhance the durability of your acorn caps and give them a slight sheen, a clear sealant or varnish can be applied. This is particularly useful if your fairy lights will be exposed to any moisture or frequent handling.
Having these materials ready will set you up for a successful and enjoyable crafting session. Now, let’s move on to the exciting part: transforming these simple components into something truly magical!
Step-by-Step Instructions
Step 1: Gather and Prepare Acorn Caps
This initial step is crucial for the success and longevity of your acorn cap fairy lights. The quality of your acorn caps will directly impact the final aesthetic and durability of your project.
1. Collection: Head outdoors to a park, forest, or any area with oak trees. Look for fallen acorn caps that are intact, free from cracks, and ideally, still have a bit of their natural stem attached. Collect a variety of sizes, as this will add visual interest to your finished string of lights. Remember, the more caps you gather, the more lights you can create!
2. Cleaning: Once you have your collection, it’s important to clean them thoroughly. Acorn caps can harbor dirt, small insects, or even mold. You can gently brush off any loose debris with a dry brush. For a more thorough cleaning, you can soak them in a solution of water and a small amount of mild dish soap for about 15-20 minutes. Avoid prolonged soaking, as this can damage the caps.
3. Drying: After cleaning, spread the acorn caps out on a clean towel or baking sheet in a single layer. Allow them to air dry completely for several days. Ensure they are in a well-ventilated area, away from direct sunlight, to prevent warping or cracking. You can also bake them at a very low temperature (around 200°F or 90°C) for an hour or two to speed up the drying process and kill any lingering pests, but keep a close eye on them to prevent burning.
4. Optional: Sealing for Durability: If you plan to use your fairy lights outdoors or want to ensure their longevity, consider applying a clear sealant or varnish to the acorn caps. A matte or satin finish will help retain their natural look. Apply a thin, even coat and allow them to dry completely according to the product instructions. This step will protect the caps from moisture and general wear and tear, making your beautiful creation last even longer.
Proper preparation of your acorn caps will ensure they are ready to be transformed into charming light covers. Take your time with this step, as it lays the foundation for a successful project.
Step 2: Prepare the Fairy Lights
While the acorn caps are drying, or once they are ready, you can prepare your fairy lights. This step is straightforward but important to ensure your lights are ready for the next stage of the project.
1. Unravel and Untangle: Carefully unspool your string of fairy lights. They often come tightly wound, so take your time to gently untangle any knots or twists. Lay them out in a relatively straight line on a clean, flat surface. This will make it easier to work with them in the subsequent steps and prevent frustration.
2. Test the Lights: Before you begin attaching the acorn caps, it’s a good idea to test your fairy lights to ensure they are all working correctly. If they are battery-operated, insert the batteries and switch them on. If they are plug-in lights, plug them into an outlet. Check that every single bulb illuminates. It would be disheartening to complete the project only to find a section of lights isn’t working! If any bulbs are out, try to troubleshoot according to the manufacturer’s instructions, or set aside that section if the bulbs are not replaceable.
3. Plan Your Spacing (Optional but Recommended): While not strictly necessary, you might want to consider the spacing of your acorn caps on the fairy light string. If you have a long string of lights and a limited number of acorn caps, you might choose to skip some bulbs to create a more spread-out effect. Conversely, if you have many caps, you can cover every other bulb or even every bulb for a denser look. This planning can help you visualize the final product and ensure you have enough caps for your desired aesthetic.
With your fairy lights ready and tested, you’re one step closer to illuminating your home with these charming, nature-inspired decorations. The next step involves a bit of precision to prepare the acorn caps for their new role.
Step 3: Drill Holes in Acorn Caps
This step requires a steady hand and careful attention to detail. The goal is to create a hole in each acorn cap that is just large enough for the fairy light bulb to pass through, but snug enough to hold it securely.
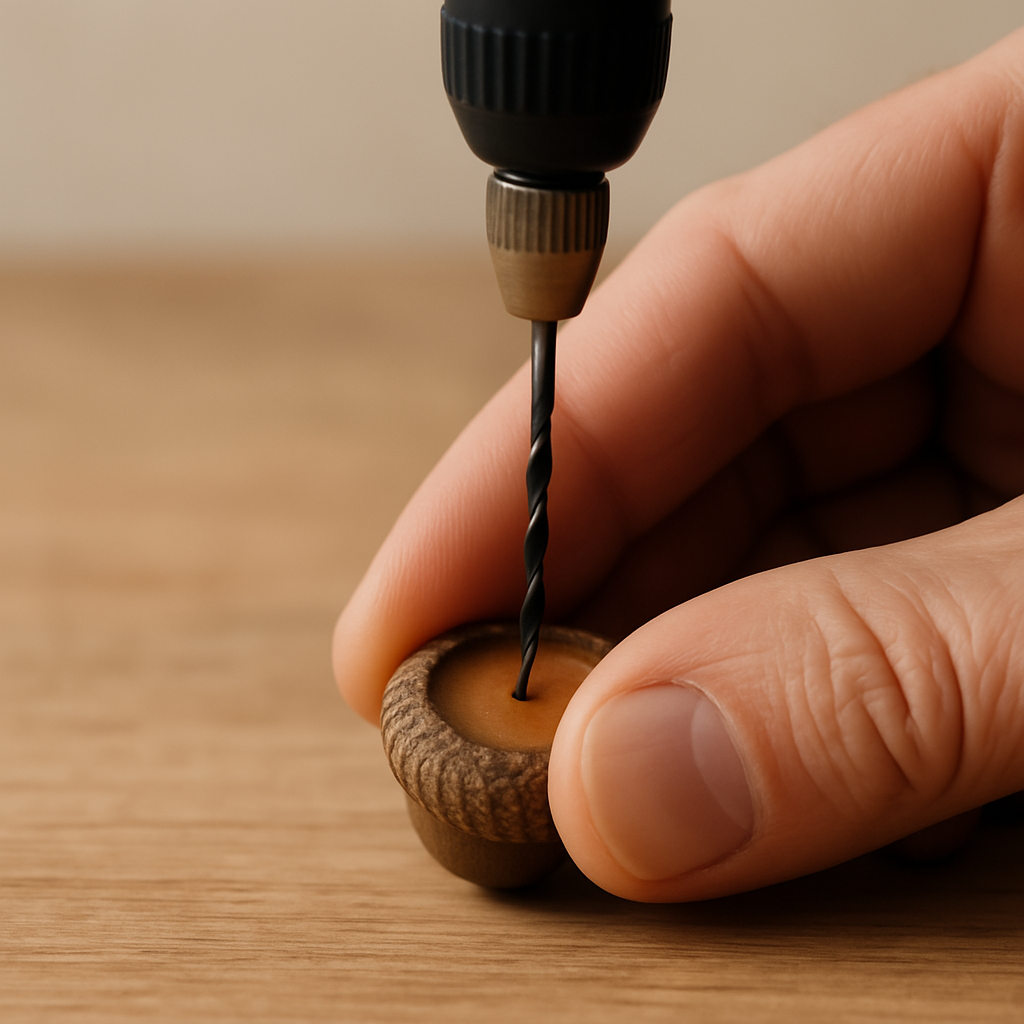
1. Choose Your Tool: As mentioned in the materials section, you can use a small drill with a drill bit (recommended for precision) or a sharp awl. If using a drill, select a bit size that is slightly smaller than the base of your fairy light bulbs. You can always widen the hole if needed, but you can’t make it smaller.
2. Secure the Acorn Cap: To prevent the acorn cap from slipping while drilling, hold it firmly between your thumb and forefinger, or use a small clamp if you have one. Be mindful of your fingers and ensure they are well clear of the drill bit or awl.
3. Drill the Hole: Carefully position the drill bit or awl in the center of the inside of the acorn cap. Apply steady, gentle pressure and begin to drill or push through the cap. If using a drill, start at a low speed and gradually increase as the bit bites into the cap. If using an awl, twist it back and forth while applying pressure until you pierce through. The goal is a clean, circular hole.
4. Test and Adjust: Once you’ve made a hole, gently try to push a fairy light bulb through it. The fit should be snug. If it’s too tight, carefully widen the hole slightly using the drill bit or awl. If it’s too loose, the acorn cap might not stay in place, so aim for a secure fit. Repeat this process for all the acorn caps you intend to use.
Safety Note: Always exercise caution when working with sharp tools. If you are unsure, consider wearing protective gloves or asking for assistance from someone experienced with drilling. A stable work surface is also highly recommended.
With your acorn caps now perfectly prepped with their new openings, we are ready for the exciting part: bringing the lights and caps together!
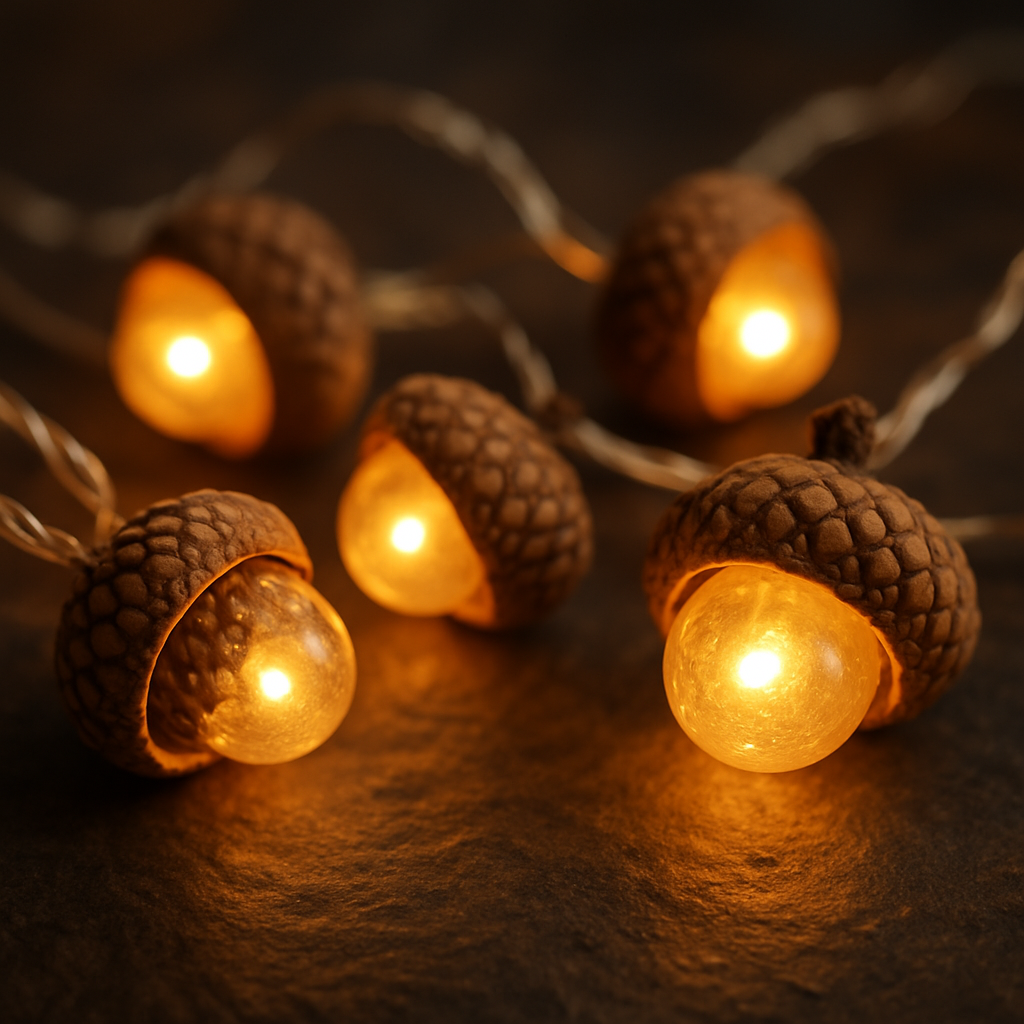
Step 4: Attach Acorn Caps to Fairy Lights
This is where the magic truly begins, as you start to see your individual components transform into a cohesive and enchanting decorative piece. The hot glue gun will be your best friend in this step.
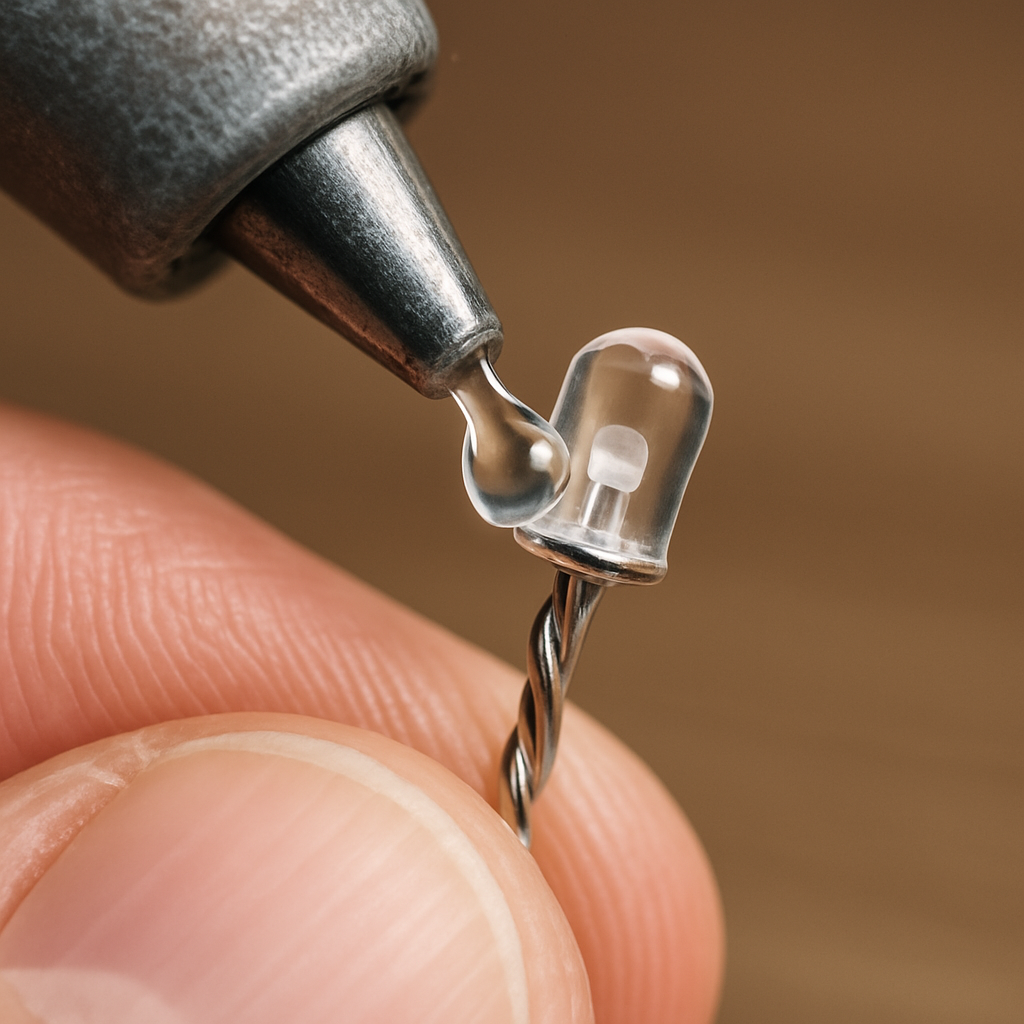

1. Prepare Your Hot Glue Gun: Plug in your hot glue gun and allow it to heat up completely. This usually takes a few minutes. Ensure you have a stable surface to rest the hot glue gun on when not in use, and protect your work area from any potential glue drips.
2. Apply Glue to the Light Bulb Base: Take one fairy light bulb. Apply a small, pea-sized amount of hot glue around the very base of the light bulb, where it connects to the wire. Be careful not to apply too much glue, as it can be messy and may seep into the acorn cap. The goal is to create a secure bond without excess.
3. Insert Bulb into Acorn Cap: Immediately after applying the glue, carefully insert the light bulb into the drilled hole of an acorn cap. Push the bulb through until the base of the bulb is flush with the inside of the acorn cap, and the glue makes contact with the cap. Ensure the acorn cap is facing the desired direction (usually with the opening facing downwards or outwards, depending on your preference).
4. Secure and Hold: Hold the acorn cap and the light bulb firmly together for a few seconds until the hot glue sets. Hot glue dries relatively quickly, but a few seconds of gentle pressure will ensure a strong bond. You can gently rotate the acorn cap to ensure it’s straight and aligned as the glue cools.
5. Repeat the Process: Continue this process for all the fairy lights you wish to cover. Work systematically along the string of lights, ensuring consistent spacing if that was part of your plan. Take your time, and enjoy watching your string of ordinary fairy lights transform into something truly special.
Tip: If you accidentally get hot glue on your fingers, do not try to wipe it off immediately, as it will be very hot. Let it cool for a few seconds, and then it should peel off easily. Always exercise caution when working with hot glue.
With each acorn cap securely attached, your fairy lights are now adorned with their natural, rustic covers. The next step is to arrange and display your beautiful creation, bringing its warm glow to life!
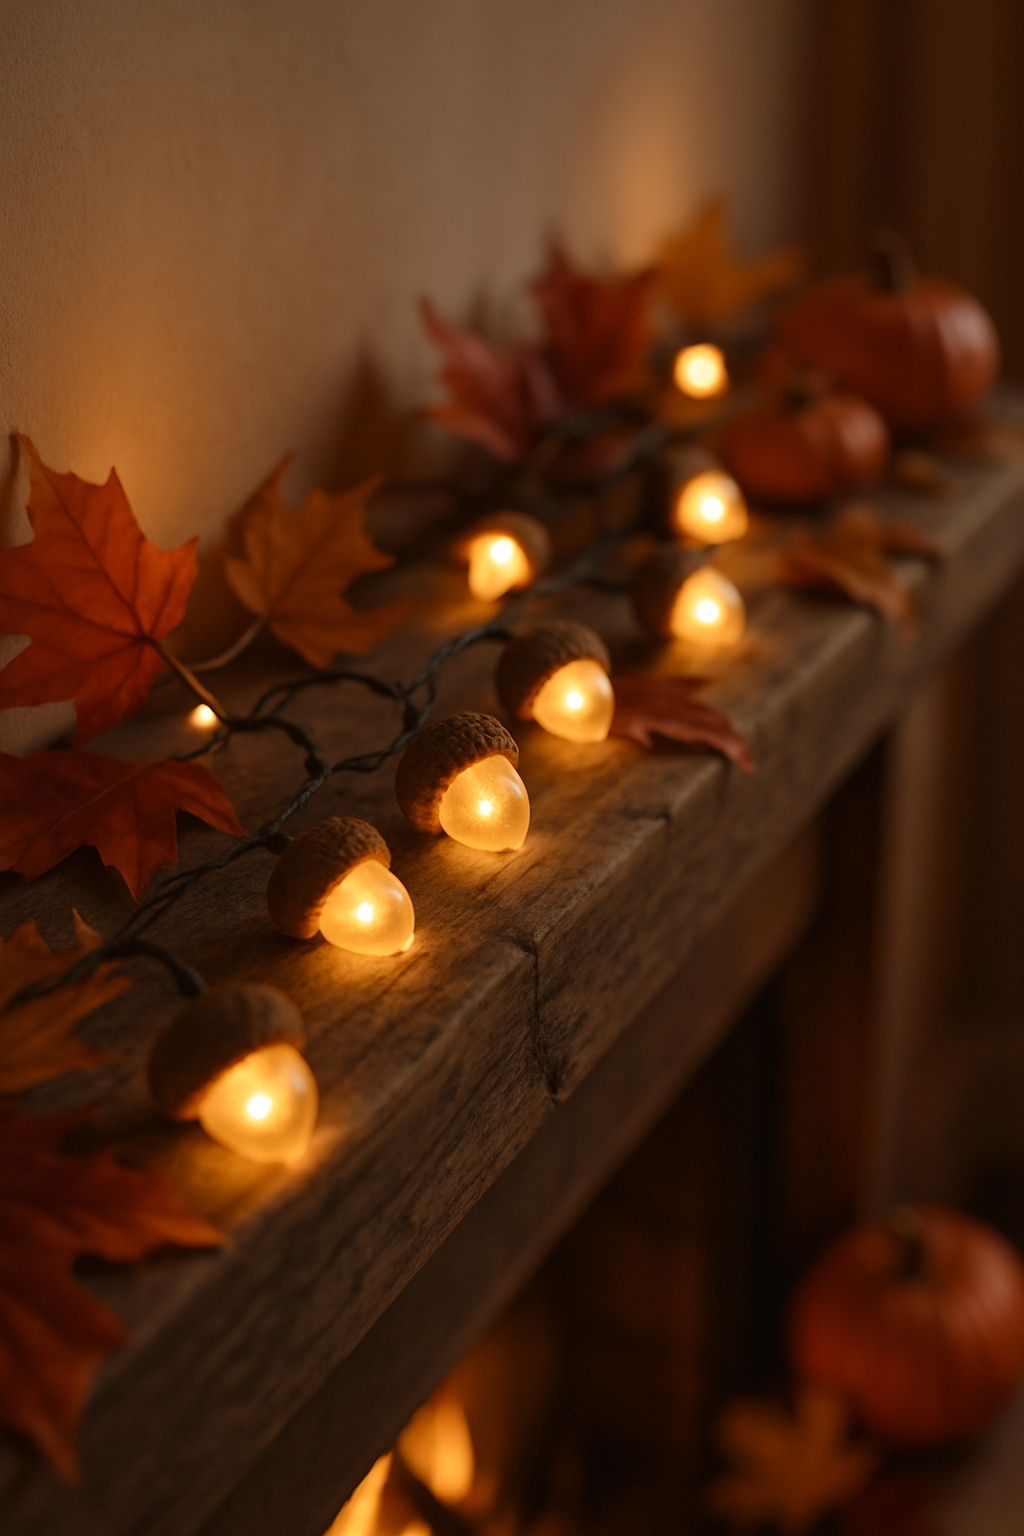
Step 5: Arrange and Display Your Enchanting Lights
Congratulations! You’ve successfully transformed simple acorn caps and fairy lights into a captivating piece of decor. Now comes the exciting part: arranging and displaying your new creation to bring warmth and charm to your space.
1. Choose Your Display Location: The beauty of these acorn cap fairy lights lies in their versatility. Consider where you want to add a touch of natural elegance. Here are a few ideas:
* Mantelpiece Magic: Drape them along a fireplace mantel, intertwining them with other autumn or winter decor like pinecones, small gourds, or dried leaves. The soft glow will create a cozy focal point.
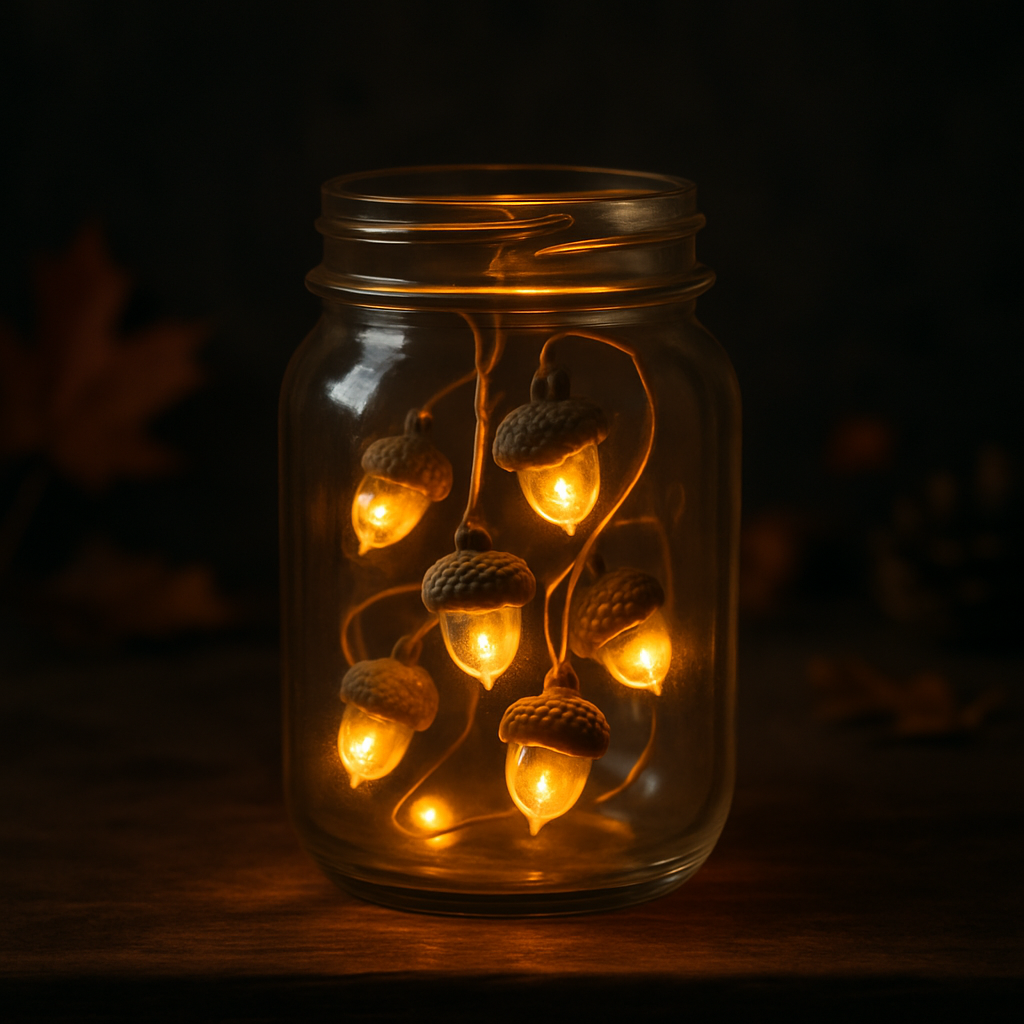
* Table Centerpiece: Coil them gently inside a clear glass jar, a decorative bowl, or around a floral arrangement to create a stunning centerpiece for your dining table or coffee table. The lights will reflect beautifully off the glass.
* Shelf or Bookshelf Accent: Weave them through shelves, around books, or among other decorative objects to add a subtle, warm glow to your display areas.
* Bedroom Ambiance: Hang them above a headboard, around a mirror, or along a window frame to create a serene and inviting atmosphere in your bedroom.
* Outdoor Charm (if sealed): If you sealed your acorn caps, you can use them to adorn a covered porch, a patio, or even wrap them around a small tree or bush for a magical outdoor touch. Ensure your battery pack is protected from the elements.
2. Arrange with Care: As you arrange your lights, gently manipulate the wire to achieve your desired look. The flexibility of fairy lights allows for creative draping, coiling, and weaving. Step back occasionally to assess the overall effect and make adjustments as needed.
3. Turn on the Lights and Enjoy: Once your acorn cap fairy lights are in place, switch them on and bask in their enchanting glow. The warm light filtering through the natural caps creates a unique and inviting ambiance that celebrates the beauty of the season.
These handmade lights are not just decorations; they are a reflection of your creativity and a celebration of nature’s simple treasures. Enjoy the cozy atmosphere they bring to your home!
Conclusion: Embrace the Glow of Handmade Charm
And there you have it! From humble acorn caps to enchanting fairy lights, you’ve successfully crafted a unique and beautiful piece of decor that brings the warmth and magic of nature indoors. This project is a wonderful reminder that sometimes, the most captivating decorations are those we create with our own hands, using materials readily available around us.
These acorn cap fairy light covers are more than just a craft; they are a celebration of the changing seasons, a nod to sustainable decorating, and a testament to the joy of DIY. They offer a soft, inviting glow that can transform any space into a cozy haven, perfect for quiet evenings, festive gatherings, or simply adding a touch of rustic elegance to your everyday.
We encourage you to personalize your creations. Perhaps you’ll experiment with different types of natural elements, vary the spacing of your lights, or even paint some of your acorn caps for a pop of color. The possibilities are endless when creativity meets nature.
We hope you enjoyed this tutorial and are delighted with your new acorn cap fairy light covers. Share your creations with us and inspire others to embrace the glow of handmade charm. Happy crafting!